
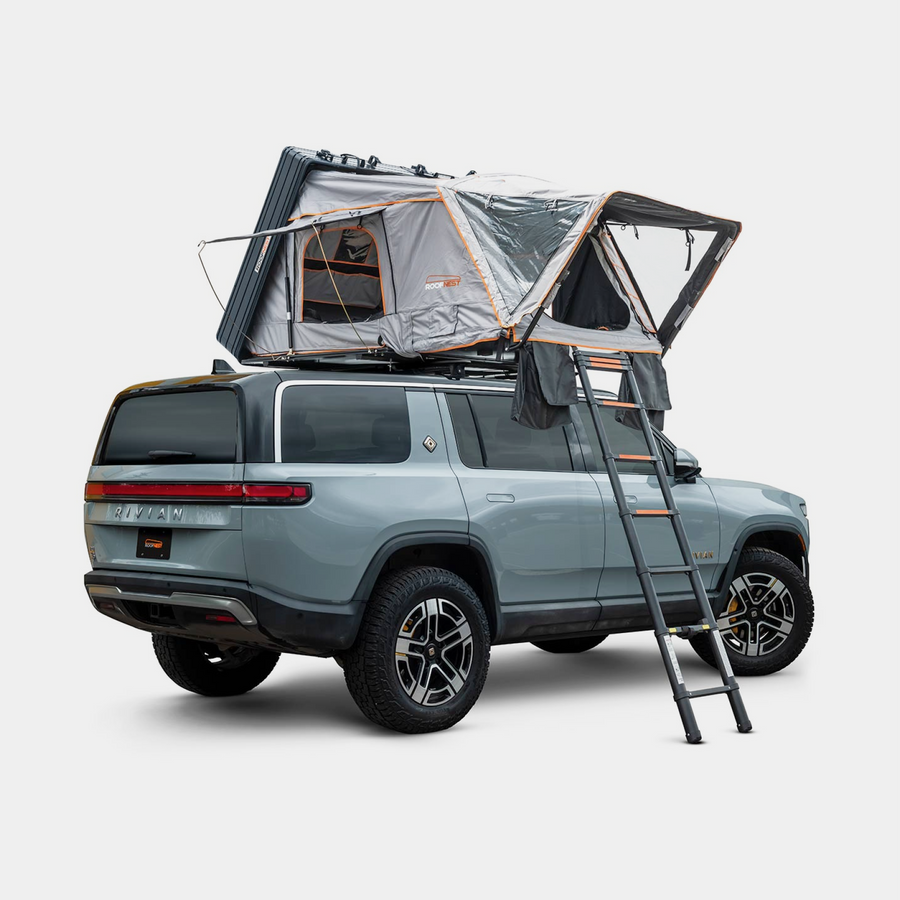


Rivian R1S - Adventure Kitchen with Sleep Platform
Lead time 3 - 5 weeks
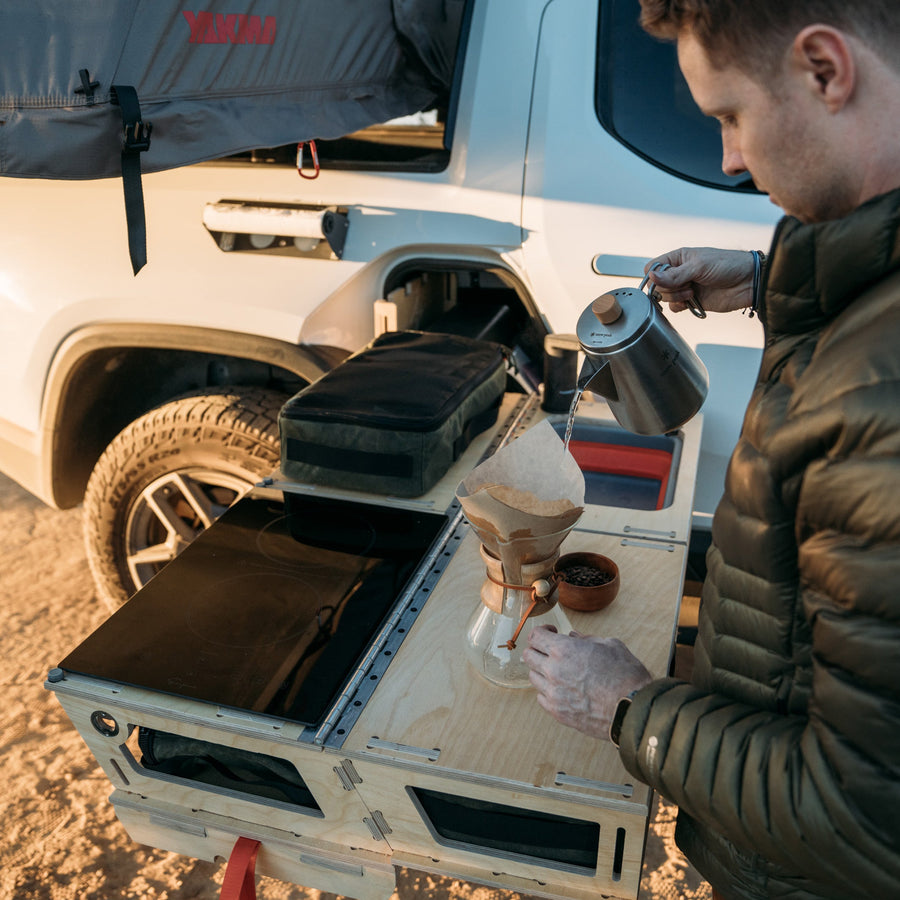
The Thunderbolt Adventure Kitchen with Sleep Platform is the deluxe companion for your camping and tailgating experience. Imagine hot cocoa in the parking lot of the ski resort! Constructed with marine-grade plywood and powered by your Rivian R1S, it features a dual burner induction cooktop and a collapsable sink. Most notably the kitchen telescopes open to unveil about 9 sqft of countertop space for prep! Heck, we even included a bottle opener for the chef!
- Fits behind the third row of seating
- Utilizes the channels in the floor of the R1S to secure the kitchen in place
- Unit lifts up with gas assist shocks to allow full access to spare tire well
- The Camp Kitchen comes with a canvas bag for storing cooking needs
- All surfaces are protected with a durable finish.
- The Induction Cooktop comes with a 2-year MFG warranty and is ETL Certified.
- Support structure is sized to fit in the spare tire wheel well when not in use.
- Sleep platform can integrate with the kitchen to provide a flat surface from just behind the front seats all the way to the back window on which to unfurl an inflatable or foam mattress.
- All surfaces are protected with a durable finish.
- Kitchen Dims: 43"W x 20.5"D x 9"H
- Sleeping Platform Dims: 43"W x 60"D
NOTE: Photos are of prototype. After testing this model, we decided to move the sink to the right to improve workflow for the cook.
Lead time 2 - 4 weeks
Now shipping to the continental USA and Canada!
The R1S Adventure Kitchen is designed to fit behind your third row of seats so you can take your whole crew -- and the kitchen sink -- on your next adventure. The following guide will step you through installing your Adventure Kitchen as well as the optional sleeping platform.
You do not need any tools to install or remove your R1S Adventure Kitchen. We utilize your vehicle's track in the cargo area to secure the kitchen. The sleeping platform utilizes the child seat tether anchor point to position the support structure in the correct place.
To prepare your vehicle for the installation, remove the cover of the spare tire well. You can leave the storage organization tray in place. Also remove the tie down downs from the speed track so that the track is empty.
First we'll walk through installing the Adventure Kitchen. Each unit ships with four cam clamps. There is some variation between vehicles so we've provided different sized washers to ensure a snug fit regardless of your vehicle's trim kit. Here is a photo of how you will arrange the washers so that they will slide into the track on the floor of your cargo area. You'll either position the largest or medium sized washer at the bottom of the bolt.

Now that you have your cam clamp set up for your vehicle, you're going to insert one in each of the holes in the base of your Adventure Kitchen. The washer that fits into the track of your vehicle will be on the bottom of the bolt. Insert the bolt from the bottom through the hole in the frame of the kitchen. Stack the other washers (with the black washer in between the other two stainless washers) and then thread the cam lever loosely onto the bolt.
Next, open both the lift gate and the tail gate of your R1S. Have a buddy help you lift the kitchen unit onto the tailgate. Carefully line up the cam clamp assembly to the speed track. Keeping the kitchen square to the track, slide in the back washer/cam clamp assembly. Push the kitchen toward the third row and then slide in the front washer/cam clamp assembly. Make sure the kitchen is both centered and all the way back to the third row seats. Then finger tighten and then close the rear cam levers. Once the rear cam levers are closed, flip open the kitchen to assess and tighten the front cam.
Here is an image with the kitchen tipped back so you have a clear view of the cam levers:

Plug the cord for the cooktop into your vehicle's outlet. To use the cooktop, turn on your vehicle's outlets via the camping menu. To extend the "drawer" of the kitchen out, place your thumbs in the cutouts for the bottle openers on each side, push down the blue ends of the drawer slide to unlock and then use your thumbs pull the drawer toward you. Do not continue to push down on blue tips while you pull as this will allow the drawer to come completely out of the track. The cooktop slides out the same way. To put the kitchen away, just push down the blue ends to unlock the slide and push it toward your vehicle.
Now, let's get the sleeping platform set up!

To prepare your vehicle for this step, push the middle row seats to the furthest rear position. Lay out your pieces like you see in the far left image. This view is looking from your tailgate, across the kitchen and into your vehicle. Fit the spring board into the slots in the support board as shown in the second image. The tabs in the bottom of the support boards will line up with the LATCH tether anchor points in the folded down seat backs. Now, start at the front and unfold the slats over the support frame. The platform will snap into place with some of the perforations lining up with "bumps" on the support structure. The initial fit for the platform will be tight, but the straps will stretch over time. The same strapping provides the slats with a double hinge so that they can fold both directions. This will give you multiple options when folding the slats for storage.

Add an air mattress and sleeping bags or blankets and you've got a cozy spot to snooze. When you want your seats back, just fold up the slats and take apart the structure. The integral springs just need a little squeeze and they'll slide apart. Once disassembled, the support structure will fit in the storage space under the kitchen.

We hope to have a video showing the whole process soon! But if you have any questions, feel free to send us a note!
Don't take our word for it
★★★★★L.V.


